I often get asked how I take my makeup photos, how do I do my selfies, which camera do I use etc. Well, today I decided to share with you few tips and tricks I learned since I started posting makeup looks on my blog. I just want to make clear that I’m not a professional photographer and I don’t know that much about photography. What I’m going to tell you today are things that I learned in last few years and that work for me.
Which camera do I use?
The camera I use is Nikon Coolpix S3300. I received it few years ago as a gift for Christmas and it serves me well since then. It makes good photos, and because it’s small it’s easy to hold in hand. Two years ago I also purchased a tripod, which I use very rarely, because I take most of my photos outside on my balcony, where it’s impossible to use it.

When and where I take my photos?
Whomever you’re going to ask how and when to take photos of your makeup they are going to tell you in the morning or afternoon, but never in direct sun light. I always photograph my makeup in the forenoon, because my room is on west and in the morning the sun is never shining in my room and on my balcony. In the past I took few makeup photos in my room, but photos were always so blue and I never liked them, so later I discovered that if I take them on my balcony in the forenoon they look the best. My background looks grey, but that’s because we don’t have a facade, only an insulating layer. I was thinking to put a white paper on a wall, but people are already looking me strange when I take my photos outside, what even if I’d have a special background, haha. :D But that’s one of the things that comes with blogging and I got use to it. Sometimes when I see a bigger group of people or acquaintances I get in my room and when they pass our house I go back again. I do that because I really don’t want to get asked what am I doing and then explaining everything. The most annoying thing that can happen by taking photos outside is the wind. And that happens often. If the wind isn’t strong it’s okay, but when it’s very strong I can’t take a proper photo, because my hair is all around me, in my mouth, in front of my face, and then I usually take a lot of bad photos. I personally don’t like taking photos in the evening under artificial light or with flash, because the light is too yellow and colours are often washed out.
To show you the difference between photos taken outside and in my room in front of a window I photographed the same look on both locations. As you can see photos taken inside look too blue. I think it has something to do with my green walls. But telling the truth, I don’t want white walls, I like green ones, because green makes me happy.
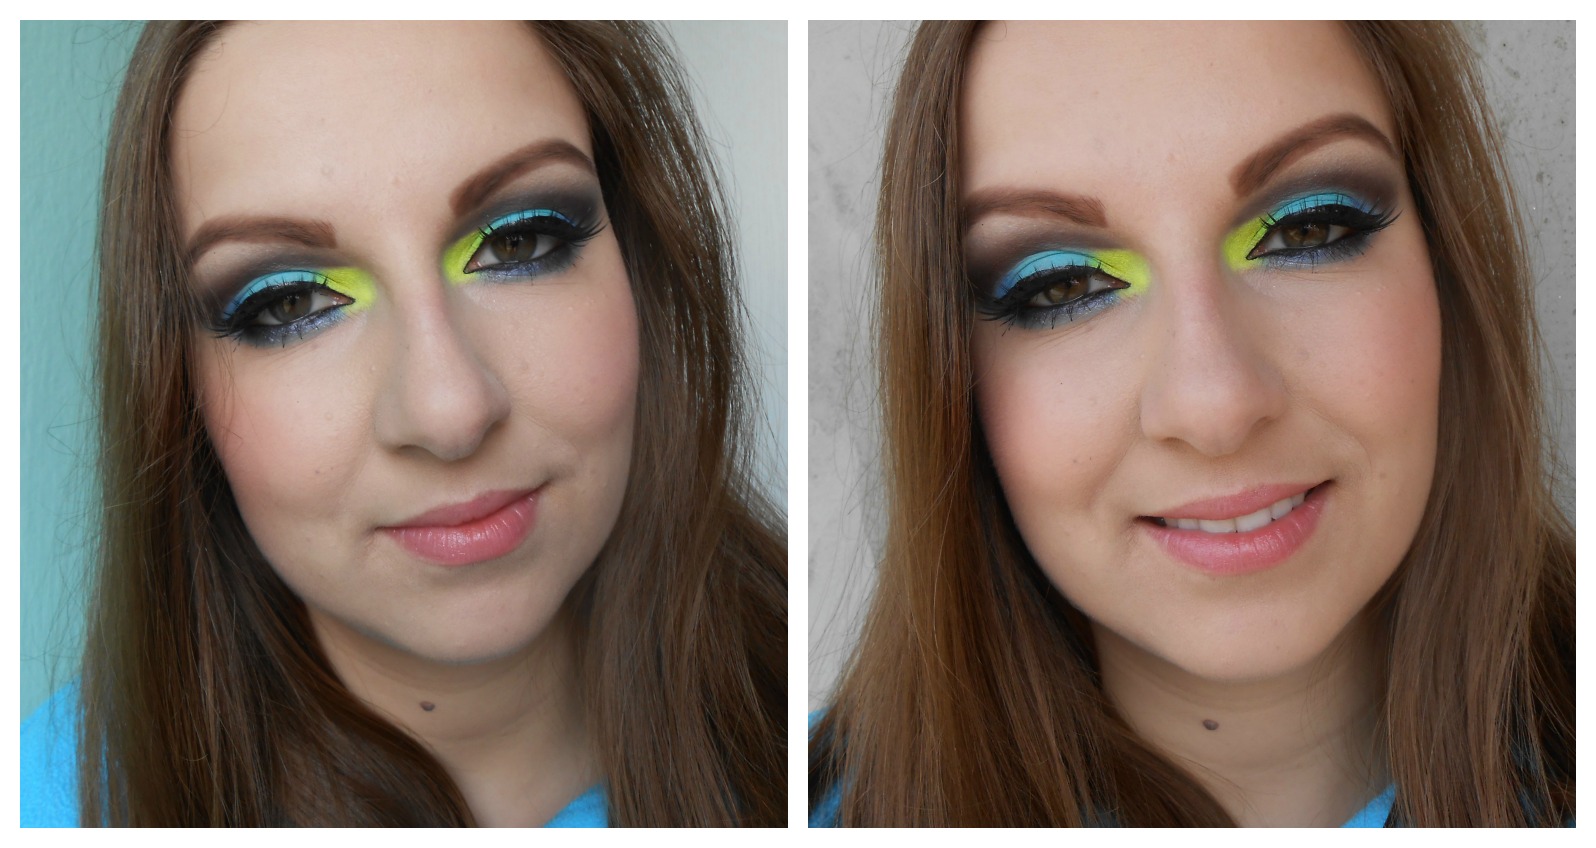 |
| Left: in front of the window inside. Right: outside in the shadow. |
How I take my photos?
My camera is small and light, so I always hold it in my hand. If I photograph my whole face I hold in so far away that my hand is almost straight, but when I photograph my eye makeup I hold it closer. With time I learned how I have to hold my camera to get my whole face on photo, but if you’re just starting help yourself with a mirror. Try different angles to discover which photos of your makeup are the best. If you’re having a small camera like I hold it in one hand and a mirror in other. If you’re having DSLR camera you’ll probably need a tripod. A tripod is also a good solution if your hands are very shaky. That way you’ll get clear photos.
When I photograph my full face I never use a macro mode, because it makes my photos blurry (remember, I take photos from far away). But when I photograph my eyes I always turn on the macro mode so my photos end up clear. I always take a lot of photos, definitely something between 100 and 200. I take as much photos as possible, just in case, because it often happens that photos are out of focus or I have hair on my face and similar.
During the photo shoot process I always check on photos I already took. That way I see if any of photos end up blurry, how I look on them, if my posses are okay, what I have to fix (I often hold chin up while taking photos and then I try to hold my head straight).
Other question I often get asked is how I take such good photos of my eye. Always when I photograph my eye or myself looking straight I lift my eyebrows up. That way colours on my lids are better seen. Also, when you focus on eye look taking a photo of an eye while looking down is always a good idea, because that way you can show your readers the party that’s going on on lids. I often take photos of my eye makeup when I’m looking down, although not always.

How I edit my photos?
For editing I use GIMP (GNU Image Manipulation Program). GIMP is a free program for editing and it’s very easy to use. It’s true I don’t master it completely, but functions I need for editing are simple to learn.
Usually I don’t do anything special while editing my makeup photos. I check every photo I took and choose the ones I like the best. I open them in GIMP, crop them, sometimes I fix the light if photo seems too dark and then I save them. That’s it. I crop photos because I usually don’t get on a photo only that what I want to show you, but more. I never photograph just my eye for a close-up eye photo, but always a half on my face as well, and that needs to be cut out. First I use a tool “Rectange select tool” and I mark the surface I want to keep. Then I click on “Image” and “Crop to selection” and my photo is ready. In the end I always export photo (“File” and “Export as”) to save it as .jpg or .png, because if I click “Save as” it saves it in .xcf form.

Summary:
- Natural lightis amazing for taking photos. I usually do it early in the forenoon, because then photos look the best. I don’t use a flash and I don’t like taking photos under artificial light, because it makes photos too yellow and colours are often washed out.
- Avoid the direct sunlight, because it will make you look yellow. If you’re taking photos outside, make sure you take them in a shadow and inside take them in front of the window in indirect sunlight. The better daylight you have in your room the better photos will look. Mine personally look too blue, but some other bloggers do perfect photos of their makeup inside.
- The background should be as simple as possible, because you want all the focus on makeup, not on what’s in the background. Mine looks grey, but it’s simple and it doesn’t bother me.
- If your hand is too shaky use a tripod. That way your photos won’t end up too blurry.
- If you want to know what you’re photographing use a mirror. If you can’t hold a camera and a mirror in hands at the same time, use a tripod for a camera. Or if you’re taking photos inside, place a mirror on a table or a chair in front of you (you’ll probably have to sit on the floor to take photos).
- If you want to show your entire makeup photograph your whole face and if you want to show your eye makeup hold a camera as close as possible and focus on eye. When photographing your eye makeup turn the macro mode option on, otherwise the camera won’t focus on eye and your photos will end up blurry.
- For editing photos use any photo editor you like. I personally use GIMP, which is a free photo editor and it’s simple to use. Select the photo you want to publish and crop out the contest you want to show to your followers.
- Practise makes perfect. Practise and try different angles and poses to figure out which one works best for you. You can practise in front of a mirror before taking photos. After some time when you’re going to learn what works the best for you, taking photos of your makeup will become a piece of cake for you.

I hope this post was helpful. If I forgot to mention something and you have something to add, just tell me and my readers in the comments bellow.
How do you photograph your makeup? Thank you for reading!